
GPU-Ready Kubernetes on AWS Made Easy with VMware Tanzu Kubernetes Grid
If you ask me what all the rage is right now, I’d say it’s AI/ML. This is a fascinating space with so much promise to create a more autonomous society. However, any new technology comes with challenges trying to learn and utilize it. Do you know if you’re ready or equipped with the hardware needed to get started? If you’re using VMware Tanzu Kubernetes Grid, creating a Kubernetes cluster with GPU-enabled nodes might be the easiest part of this process.
Support for GPU-enabled clusters began back in Tanzu Kubernetes Grid 1.4 for AWS and Azure environments. Creating clusters of ESXi hosts with two types of NVIDIA GPU cards using PCI passthrough was introduced in Tanzu Kubernetes Grid 1.6. To demonstrate how easy it is to enable, let’s go through the quick steps required to make it happen. To see this in action, skip to the bottom of this post and watch the video.
Compute on demand with the cloud makes acquiring hardware easier than ever. Access to beefy servers with high-performing GPU cards isn’t at my disposal, so I’m looking at Amazon EC2 to make it happen. Look no further than the plethora of Accelerated Computing instance types available. Analyze the different types and decide what fits your budget based on the number of GPUs, GPU memory, vCPUs, and standard memory.
A sample cluster config will be generated after the management cluster has been deployed. If this isn’t available, copy the Workload Cluster Template to your local machine. The only line that needs to be edited is NODE_MACHINE_TYPE to the EC2 instance type of choice.
NODE_MACHINE_TYPE: g4dn.8xlarge
Deploy the template to the Tanzu Kubernetes Grid instance, wait for the machines to become available, and set the kubeconfig context to interact with the cluster. Now, all that is left is to deploy the GPU cluster policy and GPU operator to the cluster. Always refer to the documentation under Deploy a GPU-Enabled Cluster for direct links to these YAML files. These YAML files will point to the versions that correlate to a Tanzu Kubernetes Grid version. Apply these YAML files to the cluster and wait for all the deployments to complete.
kubectl apply -f clusterpolicy-crd.yaml

customresourcedefinition.apiextensions.k8s.io/clusterpolicies.nvidia.com created


kubectl apply -f gpu-operator-components.yaml

namespace/gpu-operator-resources created

serviceaccount/gpu-operator-node-feature-discovery created

serviceaccount/gpu-operator created

configmap/gpu-operator-node-feature-discovery created

clusterrole.rbac.authorization.k8s.io/gpu-operator-node-feature-discovery-master created

clusterrole.rbac.authorization.k8s.io/gpu-operator created

clusterrolebinding.rbac.authorization.k8s.io/gpu-operator-node-feature-discovery-master created

clusterrolebinding.rbac.authorization.k8s.io/gpu-operator created

service/gpu-operator-node-feature-discovery created

daemonset.apps/gpu-operator-node-feature-discovery-worker created

deployment.apps/gpu-operator-node-feature-discovery-master created

deployment.apps/gpu-operator created

clusterpolicy.nvidia.com/cluster-policy created

That’s it! It’s truly that easy. However, here are some helpful troubleshooting tips. If any of the images fail to pull, inspect the gpu-operator-components.yaml. In my environment, I experienced issues with pulling the container-toolkit image from nvcr.io/nvidia. Tanzu Kubernetes Grid 1.6 uses Cluster API Provider AWS v1.2.0, which points to the 1.4.7-ubuntu18.04 image for the container-toolkit. Even though all new images are on nvcr.io/nvidia, this version is also hosted on Dockerhub, so a simple fix was to point it to the docker.io repo.
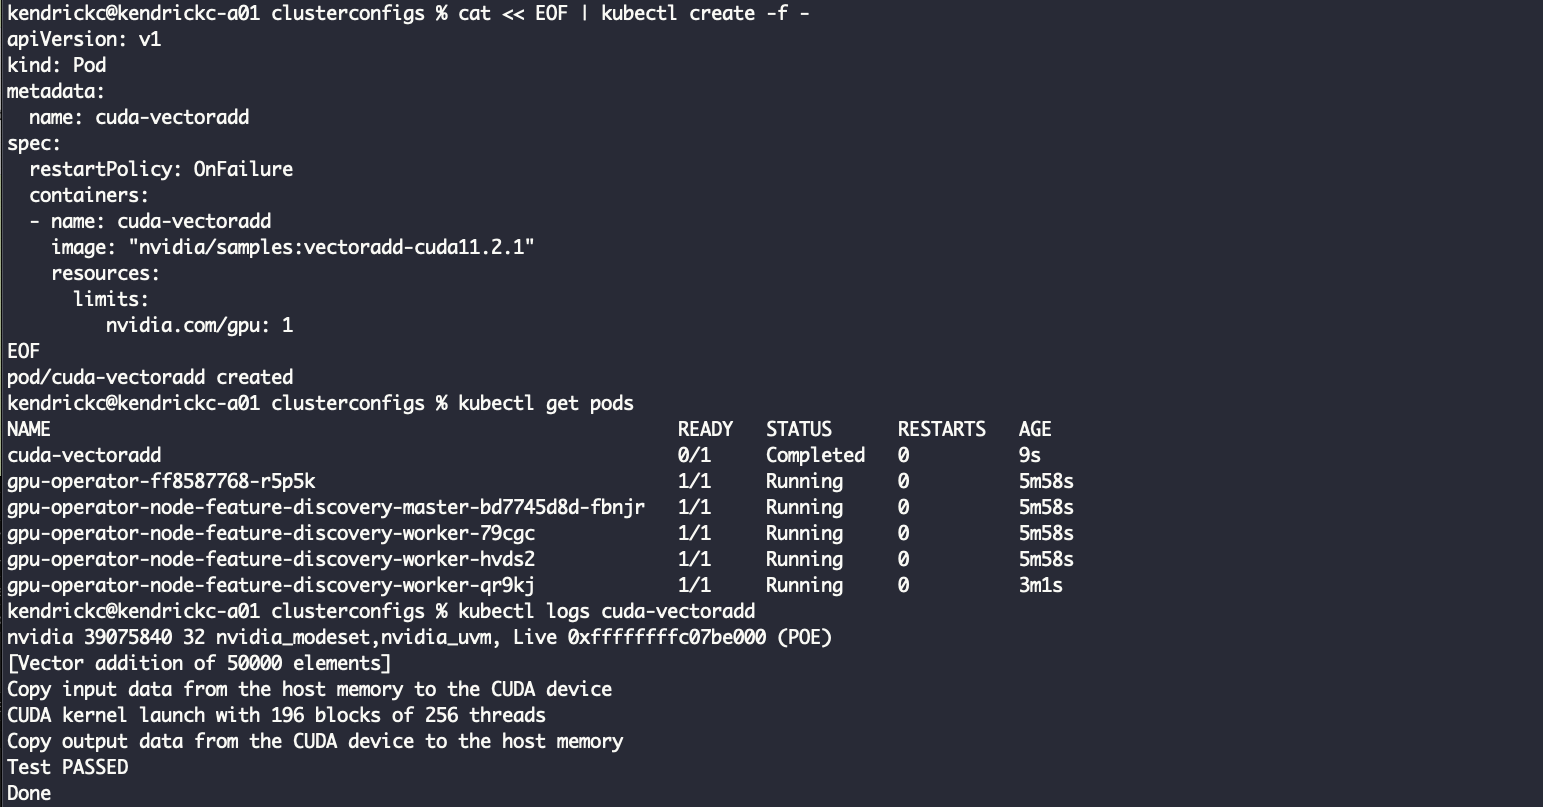
To verify it’s working as expected, there are sample GPU applications from NVIDIA’s documentation. The first is a sample CUDA VectorAdd that runs very quickly and shows a passed test.
The final test is deploying a TensorFlow Jupyter notebook that allows running all sorts of available scripts. Pull down the deployment and edit it to be more AWS friendly. Remove NodePort and change the service to type LoadBalancer so it can be easily accessed from anywhere.
apiVersion: v1

kind: Service

metadata:

  name: tf-notebook

  labels:

 app: tf-notebook

spec:

  type: LoadBalancer

  ports:

  - port: 80

 name: http

 targetPort: 8888

  selector:

 app: tf-notebook
After applying the deployment, get the ELB endpoint, and get the token from the logs in the pod to access the notebook. Now there are a few TensorFlow scripts to play with.

Watch the video below to see it all in action. Always remember to refer to the Tanzu Kubernetes Grid documentation for the latest updates, and check out Tanzu Kubernetes Grid on Tech Zone for more great articles.